DIY: Easy [Gluten-free!] Cake Pops and Stand

Gluten Free Cake Pops

Gluten Free Cake Pops

I know I haven’t traditionally included foodie DIYs, but I had to craft the stand for my cake pops – so it counts! Please ignore my creepy BF and his pal in the background of the pic!

Materials/Ingredients:

  1. 1 box of store bought cake mix (I used a gluten free flavour by Betty Crocker)
  2. Water/oil/eggs for cake mix
  3. Large bowl for mixing cake crumbs and icing together
  4. Cookie sheet
  5. 2 tbsps of store bought icing (or made from scratch – icing sugar, milk, butter) in any flavour.
  6. 1.5 lbs Candy melts – any colour! Found mine at Bulk Barn. Use multiple colours if you wish!
  7. Sprinkles – found mine at Bulk Barn
  8. Cake Pop sticks – I could only find lollipop sticks (again at Bulk Barn), but if you find actual Cake Pop sticks let me know!
  9. Styrofoam block (at least the size of a shoe box)
  10. Optional: Wrapping paper and ribbon

Directions:

  1. Following the instructions on the store bought cake mix, bake your cake. Don’t worry about the size of the pan or anything because your next step is to crumble the cake!
  2. Once the cake has finished baking and cooled, crumble the cake! Crumble crumble crumble into a large bowl. Add icing to the bowl and really mix the crumbs and icing, kneading and squishing cake and icing together with your [clean!] hands. Add more icing if needed. Mixture should be able to hold small ball shapes
  3. Using a small cookie scoop,  measure out 2 scoops of the mixture. Use your hands to create a ball. Place on an ungreased cookie tray. Keep going till you have balled up all of the mixture.
  4. Begin melting your candy melts. I used the microwave to melt the candy melts in a regular cereal bowl. Dip your cake pop sticks into the melted candy melts (about an inch deep), and stick into your cake pops. This will help keep the stick in the ball when you eat them!
  5. Place tray in freezer for 20 minutes. While in the freezer, make sure you prepare enough melted candy melts. I used a ramekin for this part as you want a bowl small enough and deep enough to be able to completely submerge your pops in. Place sprinkles in a separate bowl, similar in size to a ramekin.
  6. Get your styrofoam block ready as you will need somewhere to stick your cake pops soon! I chose to wrap wrapping paper around my block to make it look prettier 🙂 This is of course optional.
  7. Take out the pops from the freezer and begin! Fully submerge your cake pops into the melted candy melts, then dip them into your sprinkles. Stick the finished pop in your styrofoam block. Keep going till all your pops are dipped!
  8. Stick in the fridge until they are ready to be eaten.

Enjoy! Nom nom nom.

DIY: His and Her Mugs

Need a personalized wedding gift?

His and Her Mugs

Meet the cutest DIY wedding gift – His and Her Mugs!

You can either write their names, like I did above, or just “His” and “Hers”

Materials

  1. Plain mugs, I bought mine from Benix & Co. on sale, but you can always count on Dollarama!
  2. Porcelain Pen – I bought mine, in black, for $5 at DeSerres
  3. Optional: Stencils, found at Michaels and DeSerres

Instructions 

  1. Plan plan plan what you want to write, and where you want it to show up!
  2. Once you have finished your mugs, place them on a cookie sheet, pop them in the oven, and turn the heat to 350F. Make sure you put the glasses in the oven while its heating up, not once it reaches 350F, or the mugs will crack.
  3. Leave the mugs in the oven for 30 minutes (starting the timer when you put the glasses in, not when the oven reaches 350F)
  4. Turn the oven off and leave the oven door open after 30 minutes. Let cool.

Mugs can be handwashed or put in the dishwasher 🙂

Cafe au lait anyone?

DIY: Ombre Vase

I have seen so many versions of this craft all over the web, so much so, that I doubted it would even need an introduction!

But, just in case, and without further adieu..

The Plastic Spoon Ombre Vase (pictured on the far right, behind the white birdie)

Materials (all available at Dollarama)

  1. Plastic spoons
  2. Acrylic Paint – buy one base colour, i.e. purple, blue, etc. and buy white so you can make different shades
  3. Glue gun and sticks
  4. Any type of jar (I used an old coffee canister)

Instructions

  1. Cut off the heads of the spoons. I needed 12 heads per row. Try to guestimate how many you’ll need by measuring your jar
  2. Line your spoon heads on newspaper or a plastic sheet in as many rows as will fit on your jar (I had four rows)
  3. Take your base colour and create your different shades. Play around, adding more and more white paint for each row of spoons.
  4. Once you’ve perfected your colours, begin painting your spoon heads, each row the same colour.
  5. Let your spoons dry. While they are drying, you  might consider painting your jar or canister. I painted mine black.
  6. Once everything is dry, begin glueing the spoon heads onto the canister. You can arrange your spoon heads from dark to light or light to dark, facing up or facing down, your choice! Although it seems most people agree the downward direction of the spoon head is more attractive.

Do you like it? To be honest, I am slightly indifferent towards mine. It looks kind of funny. But the examples I’ve seen look really pretty, so maybe I will give it another go.

Check out Addicted2Decorating for a pretty example. In fact, check out her whole website. It’s awesome 🙂

What do you think? Did you try it?

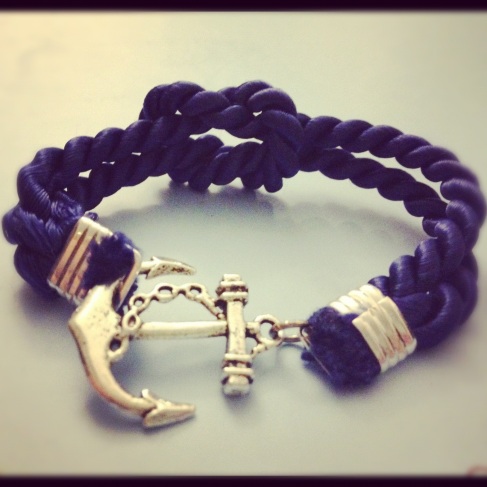
DIY: Jewelry that Anchors Me NEW AND WAYYY IMPROVED!

Image

Hey guys,

As promised – I redid my bracelet, and this time used all the correct materials AND then some…But it was way easier. I am actually so horrified by my last attempt that I am moving that post to DIY: FAILS.

Materials

  1. Anchor charm – Art On – 70 CENTS!
  2. Rope – Any craft store, $1 for 1 foot
  3. LARGE crimping beads. Its important you find ones that have a hook to attach beads or clasps too. I finally found mine at a jewelry supplies store on Queen St W, pack of 8 for $3
  4. Circle Attachers – set of 100 for $2

Instructions

  1. Measure rope by wrapping it once around your wrist. Repeat with another piece of rope (so you have 2 in total)
  2. Take one of the pieces of rope and bend it in half to create a loop. Place the crimping bead over the loose rope ends, press the crimping bead shut. The ends should join together and the anchor should be attached.
  3. Loop the second piece of rope and wrap it under and through the first piece of rope’s loop. Visit A Blissful Dream’s version for a visual reference!
  4. Once the two pieces of rope are looped together, secure the loose ends of the second rope with another metal crimping bead,  press the crimping bead shut. This is where your anchor will hook.
  5. Attach your anchor and set sail

SO nautical.